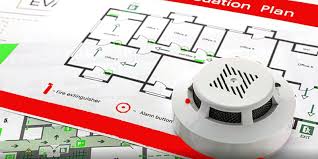
Beyond Compliance: Crafting Professional Fire Evacuation Diagrams that Meet Australian Standards
In an emergency, people rarely take the time to study complex instructions. They look for simple cues: where am I, which way do I go, and how do I get out safely? That is exactly what a well-designed fire evacuation diagram should answer in a matter of seconds. Yet in many buildings, diagrams are treated as a basic compliance requirement rather than a critical communication tool.
Going beyond the bare minimum and investing in clear, professional diagrams aligned with Australian Standards is one of the most effective ways to improve life safety in your facility.
Why Diagrams Matter More Than You Think
Alarms, PA systems and wardens all play important roles in an emergency, but your walls speak too. A strategically placed, easy-to-read fire evacuation diagram can provide instant orientation to anyone in the area, including visitors and contractors who have never attended an induction.
When people can quickly identify where they are, which exits are closest and where the assembly area is located, they move with more confidence and less panic. That smoother flow reduces bottlenecks, speeds up evacuation times and supports wardens and first responders who need to know that corridors and rooms are clearing as planned.
Poorly drawn, outdated or cluttered diagrams have the opposite effect. They slow people down, cause hesitation and can even send occupants towards unsafe routes if renovations or tenant changes have altered the layout.
Understanding the Role of Australian Standards
Australian Standards exist to ensure that evacuation information is consistent, legible and reliable across different building types. They set expectations around what information must be shown, how it should be presented and where diagrams should be located.
In practice, this means your diagrams need to include elements such as a “You are here” marker, primary and secondary egress paths, fire equipment locations, assembly areas and key symbols that follow recognised conventions. Orientation is also critical: the diagram should align with the viewer’s actual perspective so that left and right on the page match left and right in the corridor.
Complying with an evacuation diagram australian standards approach is not simply about avoiding non-compliance. It is about ensuring that anyone who walks into your building can interpret diagrams quickly, even if they have never been there before and are under stress.
Designing Diagrams That People Can Actually Use
Professional layouts focus on clarity over decoration. The goal is not to include every possible detail about the building, but to highlight the information that matters in the first 30 seconds of an emergency.
That starts with scale and simplicity. Floor plans should be close enough to reality to help with orientation, but not so detailed that desks, pot plants and minor furniture obscure escape paths. Colours should be used deliberately: for example, green for egress routes, red for fire equipment and blue or other neutral tones for general structure. High contrast improves legibility when lights are low or when smoke is present.
Text must be concise, using plain language rather than technical jargon. Legends, if required, should be short and positioned where the eye naturally falls. The “You are here” indicator should stand out clearly and be placed accurately; even a small error can mislead people at the worst possible time.
Getting Placement and Orientation Right
Even the best-designed diagram will not help if it is mounted in the wrong place. Diagrams should be positioned in locations where people naturally pause or look around: near exits and stairwells, beside lifts, in common rooms, at main entry points and in long corridors. The height should make them easy to read for most occupants, including people using mobility aids.
Orientation is often overlooked but is one of the most important factors in usability. If someone is standing facing a particular direction, the top of the diagram should generally represent what is directly in front of them. That way, when they see a corridor or doorway on the plan, it aligns with what they see in real life. This reduces cognitive load and speeds up decision-making.
Regular walkthroughs are useful for checking whether diagrams are still visible, unobstructed and relevant after any changes to fit-out or furnishings.
Keeping Diagrams Accurate and Up to Date
Buildings are living environments. Tenants change, walls are moved, doors are added or removed and rooms are repurposed. Every change has the potential to affect how accurate your diagrams are. That is why evacuation diagrams should never be treated as “set and forget.”
A simple internal process can help: whenever building works are proposed, include a check to see whether evacuation information needs updating. After the work is completed, verify routes on the ground and compare them with the diagrams before signing off. It is often more efficient to schedule periodic reviews across the entire building, especially in multi-tenant sites.
Out-of-date diagrams can be more dangerous than no diagrams at all, because they give a false sense of security. Committing to regular updates is essential if you want your diagrams to remain a trustworthy source of guidance.
Integrating Diagrams with Training and Drills
Evacuation diagrams are at their most powerful when they are part of a broader emergency planning framework. Staff inductions, toolbox talks and formal training sessions are ideal moments to reference the diagrams, explain how to read them and walk people through the meaning of key symbols.
During evacuation drills, wardens can encourage occupants to use nearby diagrams to identify alternative exits or understand route choices. This reinforces the habit of looking for information rather than relying only on memory or familiar paths. Over time, people become more comfortable with using diagrams as a normal part of how they navigate emergencies.
By linking diagrams to real-world practice, you move beyond compliance and begin building genuine preparedness.
Partnering with Specialists to Raise the Standard
While basic diagrams can technically be produced in-house, working with an experienced provider often leads to far better outcomes. Specialists understand both the letter and the intent of the standards. They know how to balance precision with readability, where to place emphasis and how to adapt layouts for different building types and occupant profiles.
They can also coordinate updates across multi-site portfolios and provide advice on integrating diagrams with broader emergency management strategies, from warden training to evacuation exercises. A partner like First 5 Minutes combines this technical knowledge with practical experience from real incidents and drills.
Ultimately, professional fire evacuation diagrams are less about ticking boxes and more about respecting the reality of how people behave under stress. When you invest in diagrams that are compliant, clear and actively used, you increase the chances that, in a critical moment, everyone in your building can see what they need to do next—and act on it quickly.