Embroidery Embroidery Hoop: A Complete Guide for Beginners and Experts
Embroidery has been a beloved art form for centuries, combining creativity, skill, and patience to produce stunning designs on fabric. One essential tool in this craft is the embroidery hoop—a simple yet powerful device that keeps your fabric taut and ready for precise stitching. Whether you are new to needlework or an experienced stitcher, understanding the use, types, and benefits of embroidery hoops can elevate your craft to the next level.
What Is an Embroidery Hoop?
An embroidery hoop is a circular or oval frame designed to hold fabric tightly while you stitch. It generally consists of two rings—an inner ring and an outer ring—that sandwich the fabric between them. The outer ring often has a screw or tightening mechanism to adjust tension. This setup keeps the fabric smooth and stable, preventing puckering and ensuring neat, even stitches.
Why Is an Embroidery Hoop Important?
Using an embroidery hoop is not strictly necessary for every type of needlework, but it offers several important benefits:
Better Fabric Tension
When your fabric is stretched evenly, your stitches will be more consistent and clean. Loose fabric often leads to uneven thread tension and wrinkling.
Improved Stitch Accuracy
A taut fabric surface allows for better control of your needle, making it easier to follow patterns and execute intricate designs.
Reduced Hand Fatigue
Holding fabric tight in your hands can be tiring. A hoop supports the fabric so you can focus on your stitching without straining your grip.
Professional Finish
Embroidery done with a hoop tends to have a polished look, as it reduces distortion and keeps designs proportional.
Types of Embroidery Hoops
There are several types of embroidery hoops, each with its own advantages. Choosing the right one depends on your project, fabric, and stitching style.
Wooden Embroidery Hoops
-
Made from beechwood, bamboo, or other hardwoods.
-
Known for their durability and smooth finish.
-
Preferred by many traditional embroiderers for their natural feel.
Plastic Embroidery Hoops
-
Lightweight and budget-friendly.
-
Often come in bright colors.
-
May warp over time if low-quality.
Screw Tension Hoops
-
Feature a small screw to adjust the tightness of the outer ring.
-
Provide strong fabric tension.
-
Ideal for both beginners and professionals.
Spring Tension Hoops
-
Use a spring mechanism instead of a screw.
-
Quick to set up, but may be bulkier.
-
Suitable for quick projects or temporary holding.
Flexi Hoops
-
Made from flexible vinyl.
-
Often used for displaying finished embroidery rather than stitching.
-
Decorative and functional as frames.
Choosing the Right Embroidery Hoop Size
The size of your embroidery hoop should match the dimensions of your project. Here are some tips:
-
Small Hoops (3–5 inches): Perfect for small designs, monograms, or patch embroidery.
-
Medium Hoops (6–8 inches): Suitable for most hand embroidery projects.
-
Large Hoops (10 inches and above): Good for big designs but may require retightening during the project.
Pro Tip: Choose a hoop about 1–2 inches larger than your design area to give yourself room for comfortable stitching.
How to Use an Embroidery Hoop
Correctly setting up your hoop ensures smooth stitching and prevents fabric damage.
Step 1: Separate the Rings
Loosen the screw and remove the inner ring from the outer ring.
Step 2: Place the Fabric
Lay your fabric over the inner ring, centering the area you plan to embroider.
Step 3: Fit the Outer Ring
Place the outer ring over the fabric and inner ring, pressing it down gently.
Step 4: Tighten the Screw
Partially tighten the screw, then pull the fabric evenly around the hoop to remove wrinkles before fully tightening.
Step 5: Check Tension
Your fabric should be drum-tight—firm but not overstretched.
Tips for Getting the Best Results with Your Embroidery Hoop
-
Wrap the Inner Ring: Use cotton twill tape to wrap the inner ring for extra grip.
-
Avoid Over-Stretching: Excessive tension can distort your design after removal.
-
Retighten Regularly: Fabric may loosen as you stitch, so check the tension periodically.
-
Protect Your Fabric: Place a piece of scrap fabric between the hoop and your work to avoid marks.
When You Might Not Need a Hoop
Some embroidery styles do not require hoops, especially those using heavier fabrics or free-motion embroidery. Techniques like sashiko or certain goldwork projects can be done without a hoop, relying instead on hand tension.
Related Keyword: Embroidery Hoop in Modern Crafting
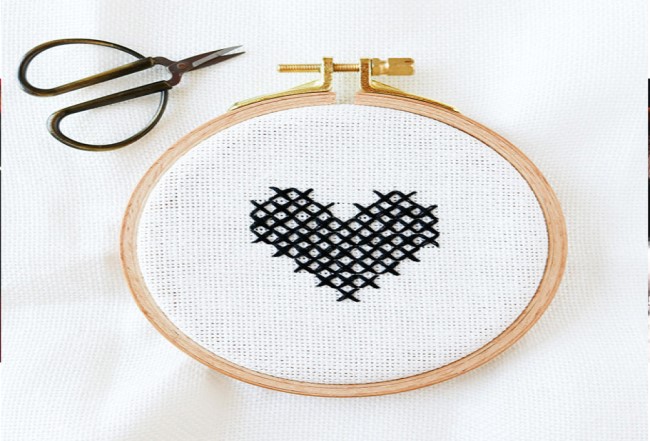
In recent years, the embroidery hoop has evolved beyond just a stitching aid—it has become a decorative item in itself. Many crafters now leave their finished work inside the hoop and hang it as wall art. With different materials, colors, and shapes available, the embroidery hoop doubles as both a functional tool and a stylish frame.
Caring for Your Embroidery Hoop
To ensure your hoop lasts for years:
-
Clean Regularly: Wipe wooden hoops with a dry cloth and occasionally treat with mineral oil to prevent drying out.
-
Store Properly: Keep hoops away from direct sunlight and humidity to avoid warping.
-
Inspect Screws: Check the screw or clasp for rust or wear, especially on metal fittings.
Final Thoughts
An embroidery embroidery hoop might look simple, but it plays a vital role in achieving professional, beautiful needlework. By understanding its types, proper usage, and care, you can enhance both your stitching experience and the quality of your finished designs. Whether you’re creating intricate patterns or minimalist designs, the right embroidery hoop will help you bring your vision to life with precision and ease.